NixOS on Scaleway machine
First I needed to get NixOS running on my Scaleway VPS. It’s not supported out of the box but in the NixOps wiki there is a handy guide to accomplish this. It basically boils down to place a file /etc/nixos/host.nix with the NixOS configuration and then use the nixos-infext script to transform the Ubuntu VM into an NixOS one by running following command:
curl https://raw.githubusercontent.com/elitak/nixos-infect/master/nixos-infect | NIXOS_IMPORT=./host.nix NIX_CHANNEL=nixos-20.09 bash 2>&1 | tee /tmp/infect.log
The machine then reboots and you have a running NixOS system.
Bootstrap NixOps
After that I copied the configuration in /etc/nixos over to the machine that runs NixOps, because it overwrites the server completely. That should be three files: hardware-configuration.nix, host.nix and configuration.nix. I transfered them into one file and it looks like this:
{
  network = {
    description = "Blog";
    enableRollback = true;
  };

  webserver =
    { config, pkgs, modulesPath, ... }:
    { nixpkgs.localSystem.system = "x86_64-linux";
      deployment.targetHost = "IP-ADDRESS";

      # hardware-configuration.nix
      imports = [ (modulesPath + "/profiles/qemu-guest.nix") ];
      boot.loader.grub.device = "/dev/vda";
      fileSystems."/" = { device = "/dev/vda1"; fsType = "ext4"; };

      # configuration.nix
      boot.cleanTmpDir = true;
      networking.hostName = "scw-practical-euler";
      networking.firewall.allowPing = true;
      services.openssh.enable = true;
      users.users.root.openssh.authorizedKeys.keys = [
        "ssh-ed25519 PUBLIC-KEY morris@laptop.local"
      ];

      # host.nix
      services.caddy = {
        enable = true;
        email = "EMAIL-ADDRESS";
        config = ''
          (common) {
            encode gzip
            header / -Server
            header / -X-Powered-By
          }
          a.test.morrisjobke.de {
            reverse_proxy 127.0.0.1:2368
          }
          b.test.morrisjobke.de {
            root * /data/http
            import common
            file_server browse
          }
        '';
      };

      virtualisation.oci-containers = {
        backend = "podman";
        containers = {
          ghost = {
            image = "ghost:3-alpine";
            ports = ["127.0.0.1:2368:2368"];
            volumes = [
              "/data/blog:/var/lib/ghost/content"
            ];
            environment = {
              url = "https://a.test.morrisjobke.de";
            };
          };
        };
      };

      # ... further config ...
    };
}
Initial deploy
Then one can create the server inside NixOps and deploy it:
nixops create ./scaleway-setup.nix -d scaleway-staging
nixops deploy -d scaleway-staging
Potential deployment problems
On my initial deployment it had problems to build the system. That is because it does a ssh connection on the server to itself. Usually it places a public ssh key in the server configuration, but in my case it failed with something like this:
cannot build on 'ssh://root@12.34.56.78': cannot connect to 'root@12.34.56.78': Permission denied, please try again.
Received disconnect from 12.34.56.78 port 22:2: Too many authentication failures
Disconnected from 12.34.56.78 port 22
error: a 'x86_64-linux' with features {} is required to build '/nix/store/ir75vkqa6jz7scjgvn1bb7lm1p2z0wl5-kernel-modules.drv', but I am a 'x86_64-darwin' with features {benchmark, big-parallel, nixos-test}
I looked on my NixOps host into the SQLite db at ~/.nixops/deployments.nixops and extracted the public key (attribute with the name none.sshPublicKey inside the table ResourceAttrs) and placed it as public key for the user root (see users.users.root.openssh.authorizedKeys.keys).
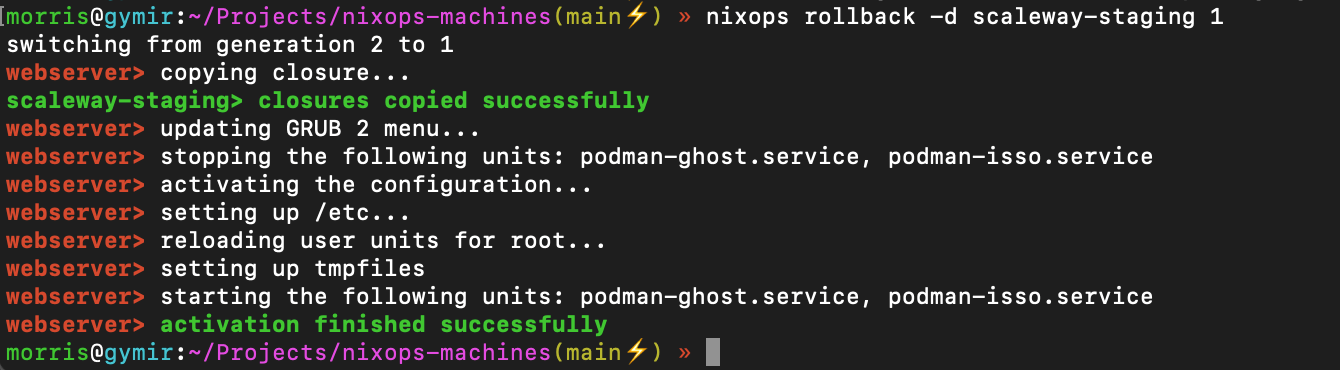
Rollbacks
The option network.enableRollback = true allows rollbacks from within NixOps.
$ nixops list-generations -d scaleway-staging
   1   2021-02-19 20:56:40
   2   2021-02-19 20:58:00   (current)
Those can be selected via nixops-rollback:
Drawbacks of Nixops
Secrets
If one places secrets inside the Nix configuration those will result in specific builds of those on the server itself in /nix/store (like /nix/store/7i9f023yvfm3b03kq2khl1djh8wrpb5z-caddy-config.json). All of the files in there are readable on the server by any user.
The NixOps manual also highlights this and provides a way (deployment.keys.<name>) to store secrets inside a temporary file system that has proper access rights and is bundled with systemd services that indicate that those files are there so that the actual service can rely on that properly and allows tracing back why a service fails. Unfortunately that also means that a reboot of the server that is not invoked via nixops will result in the secrets not being available and need to be deployed again via nixops.
Nixpkgs channel
NixOps itself deploys the packages based on a channel, but it does not use the channel configured on the server, but the channel configured on the machine where NixOps runs. So you need to be careful what you run there. I configured my laptop to use the latest release, because I noticed that on MacOS by default it uses the unstable channel that then also got deployed to the server, which is most likely not wanted. I changed it from
nixpkgs https://nixos.org/channels/nixpkgs-unstable
to
nixpkgs https://nixos.org/channels/nixpkgs-20.09-darwin
via the nix-channels command.
There is an open issue on GitHub about this to properly distinguish between the channels on the server and the nixops machine.
Automatic/unattended upgrades
The configuration of the system is not copied over to the server itself and therefore one cannot run nixos-rebuild switch --upgrade on the server. Also the system.autoUpgrade.enable option does not work, because it uses this command. There is an open issue on GitHub about this as well.
Conclusion
I really like to be able to quickly bootstrap a system. It allows to easily setup a staging environment that is really the same as the production one (or vice versa). Due to the drawbacks of NixOps I will look into an easier approach of managing remote machines as I barely need the majority of the features of NixOps and an rsync of the configuration to the server combined with an nixos-rebuild via ssh should solve 2 of the 3 drawbacks I ran into.


